
WORKING DRAFT - Upgrading Workspace ONE Access On-Premises Service Virtual Appliances - Updated for 20.10!
Updated for 20.10!
This document is to assist with upgrading on-premises VMware Identity Manager appliances, commonly known as the Service Virtual Appliance (SVA). It should be used with the official Workspace ONE Access upgrade documentation (NOTE: Select the version of the appliance you are upgrading to from the drop down menu).
This document does not cover upgrading the Windows version of Workspace ONE Access SVA nor the Workspace ONE Access Windows Connector. These are covered within the VMware documentation.
Please note there are links embedded throughout the document below in reference to the documented procedures or other information.
NOTE: Document updated for VMware Identity Manager 3.x, 19.03, 20.01, and 20.10. Most previous version notes have been removed.
Prerequisites:
Prerequisites for an online upgrade
Documentation:
- NOTE: Older docs have been decommissioned
- If on VMware Identity Manager 2.7.x or older and attempting to upgrade to 3.0, upgrade to 2.8.x/2.9.x prior to upgrading to 3.0.
- Upgrading from 2.7.x or earlier directly to 3.0 is not supported.
- If on VMware Identity Manager 3.X and attempting to upgrade to Workspace ONE Access 19.03, 20.01, or 20.10, upgrade to 3.2.0.1 or 3.3 first, then upgrade to 19.03. From there, one can upgrade to 20.01 or 20.10 directly.
- When upgrading to 19.03, be aware that internal connectors will be removed. Therefore, proper planning must be done in order to migrate to standalone (external) connectors running on Windows servers) prior to upgrading to 19.03.
- NOTE: You may use the online upgrade documentation to upgrade to a specific version rather than having to download and do an offline upgrade to said version.
- If upgrading to 20.10, ensure you are upgrading to 20.10.0.1 as this resolves any offline (or online with outbound restrictions) spring framework issues.
- Upgrading to 20.10 is only supported from 20.01 or 19.03 on-premises SLES appliances.
- Upgrading to 20.10 requires migration of SLES to Photon OS. This is done through initially performing the manual "update" using the "dualbootupdate.tar.gz" file which can first be downloaded from VMware.
- Verify that at least 4 GB of disk space is available on the primary root partition of the virtual appliance.
- Verify that at least 10 GB of free disk space are available on the virtual appliance under the /dev/sda volume when upgrading to Photon appliances from SLES.
- KB on adding a disk to an appliance - https://kb.vmware.com/s/article/2097696
- To ensure that Elasticsearch data is not deleted, prepare Elasticsearch for the upgrade.
- See the procedures within VMware documentations for ensuring ElasticSearch is not deleted.
- Take a snapshot of your virtual appliance to back it up. For information about how to take snapshots, see the vSphere documentation.
- If you are using an external database, take a snapshot or backup of the database.
- This is only necessary when upgrading the Service (SVA) nodes. It is not necessary when upgrading a standalone connector.
- See the Microsoft SQL documentation on how to conduct a manual backup of a SQL database.
- If you have revoked the db_owner role on the Microsoft SQL server, you must add it back before performing the upgrade, otherwise the upgrade will fail.
- Verify that VMware Identity Manager / Workspace ONE Access is properly configured.
- Verify that all virtual appliances (SVAs) can resolve and reach vapp-updates.vmware.com on port 80 over HTTP.
- If an HTTP proxy server is required for outbound HTTP access, configure the proxy server settings for the virtual appliance. See Configure Proxy Server Settings for the Existing Service Appliance, 20.01 or 19.03 or if you would like to configure it after upgrading to 20.10, see Enabling Proxy Server Settings After Installation.
- Confirm that a VMware Identity Manager / Workspace ONE Access upgrade exists. Run the appropriate command to check for upgrades. See Check for the Availability of a Workspace ONE Access Upgrade Online.
- If using a cluster then see the Upgrading a Cluster procedure in the documentation for whichever version you are upgrading to.
- Citrix, Horizon, Horizon Cloud, and ThinApp integrations are not available with the Workspace ONE Access 20.10 or 20.01 connectors.
- To use ThinApp packaged applications, use VMware Identity Manager connector (Linux) version 2018.8.1.0.
- To use other Virtual Apps, such as Horizon desktops and applications or Citrix published resources, use VMware Identity Manager connector (Windows) version 19.03.0.1.
Prerequisites for an offline upgrade
Documentation:
- NOTE: Older docs have been decommissioned
- Verify that at least 4 GB of disk space is available on the primary root partition of the virtual appliance.
- For 20.10, verify that 10GB of disk space is available on the primary root partition.
- Take a snapshot of your virtual appliance to back it up. For information about how to take snapshots, see the vSphere documentation.
- If you are using an external database, take a snapshot or backup of the database.
- Verify that VMware Identity Manager is properly configured.
- Confirm that a VMware Identity Manager upgrade exists. Check the My VMware site at my.vmware.com for upgrades.
- Prepare a local Web server to host the upgrade file. See the Prepare a Local Web Server for Offline Upgrade documentation for whichever version of Workspace ONE Access you are upgrading too.
Post-requisites:
Documentation:
- NOTE: Older docs have been decommissioned
The following are settings to configure after the upgrade completes successfully. If you have set up a VMware Identity Manager cluster for failover, updating it to three nodes is recommended. This is because of a limitation of Elasticsearch, a search and analytics engine embedded in the VMware Identity Manager appliance. You may continue to use two nodes but you should be aware of a few limitations related to Elasticsearch. See "Configuring Failure and Redundancy" in Installing and Configuring VMware Identity Manager for more information.
- Enable the new portal user interface.
- In the administration console, click the arrow on the Catalog tab and select Settings.
- Select New End User Portal UI in the left pane and click Enable New Portal UI.
- Transport Layer Security (TLS) protocol 1.0 is disabled by default in VMware Identity Manager 2.8 and higher. TLS 1.1 and 1.2 are supported.
- External product issues are known to occur when TLS 1.0 is disabled. Updating your other product configurations to use TLS 1.1 or 1.2 is recommended. However, if your version of products such as Horizon, Horizon Cloud, Citrix, or load balancers have a dependence on TLS 1.0, you can enable TLS 1.0 in VMware Identity Manager by following the instructions in Knowledge Base article 2144805.
Tips and Best Practices:
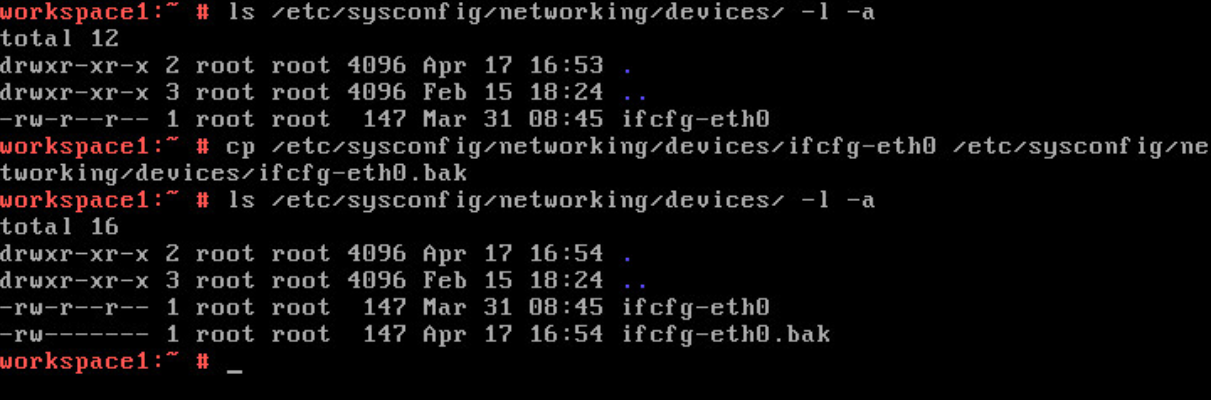
Backup of IFCFG-ETH0Make a copy of the IFCFG-ETH0 file before upgrading.
- Login to the appliance console or remote in as SSHUSER and then SU to root.
- Run the following command to make a backup of IFCFG-ETH0.cp /etc/sysconfig/networking/devices/ifcfg-eth0 /etc/sysconfig/networking/devices/ifcfg-eth0.bak
- Exit the console or SSH session.exit
VM Snapshot Backup
Make a VM snapshot before upgrading (no memory state needed unless you want one).
- Login to vSphere or vCenter.
- Browse to the VM in question.
- Right click on the VM and select options to create a new snapshot.

Database Backups or Snapshots
When upgrading the full VMware Identity Manager on-premises single virtual appliance (SVA), when taking a VM snapshot of appliance(s), it is also good practice to take a backup of the database or VM snapshot of the database server.
Online Updates and Proxy Settings
When doing an online update, you may need to set an outbound proxy within the appliance in order for it to reach the Internet and download the update packages. Essentially the appliance must be able to reach vapp-updates.vmware.com on TCP port 80 (HTTP). The latest instructions for setting a proxy for online upgrade can be found in the Workspace ONE Access Documentation online. If an HTTP proxy server is required for outbound HTTP access, configure the proxy server settings for the virtual appliance. See Configure Proxy Server Settings for the Existing Service Appliance, 20.01 or 19.03 or if you would like to configure it after upgrading to 20.10, see Enabling Proxy Server Settings After Installation.
Post-Update Apply Hot Patches
Apply any necessary hot patches after upgrading.
The Upgrade Process
The short version of the over-the-air procedure is…
- Login to the appliance console and make a backup of IFCFG-ETH0.
- Make a backup of /etc/sysconfig/networking/devices/ifcfg-eth0.
- Login to the appliance console or remote in as SSHUSER and then SU to root.
- Run the following command if you wish to make a backup of IFCFG-ETH0.cp /etc/sysconfig/networking/devices/ifcfg-eth0 /etc/sysconfig/networking/devices/ifcfg-eth0.bak
- Exit the console or SSH session.exit
- Make a VM snapshot (no memory state needed unless you want one).
- Login to vSphere or vCenter.
- Browse to the VM in question.
- Right click on the VM and select options to create a new snapshot.
- If using a cluster then see the Upgrading a Cluster procedure in the documentation for whichever version you are upgrading to.
- Perform an Online Upgrade:
- Log in to the VMware Identity Manager virtual appliance as the root user.
- Run the following updatemgr.hzn commands./usr/local/horizon/update/updatemgr.hzn updateinstaller
- Run the following command to check if any online upgrade exists./usr/local/horizon/update/updatemgr.hzn check
- For upgrades specifically to Workspace ONE Access 20.10.x, the following must also be done in order to upgrade SLES to Photon OS.
- Upload the dualbootupdate.tar.gz file to the appliance and position as necessary. Documentation recommends placing within /db/ and then referencing it within the following update command.
- After the dualbootupdate.tar.gz file is uploaded, the following command should be executed to convert the SLES appliance to Photon OS. Enter Y to upgrade or N to cancel out./usr/local/horizon/update/updatemgr.hzn update --file /db/dualbootupdate.tar.gz
- Check the following log file for messages./opt/vmware/var/log/update.log
- Run the following command to check for any additional online upgrade./usr/local/horizon/update/updatemgr.hzn check
- For older upgrades (i.e. Workspace ONE Access 20.01 or older), simply run the following command to update the appliance./usr/local/horizon/update/updatemgr.hzn update
- Messages that occur during the upgrade are saved to the update.log file at /opt/vmware/var/log/update.log.
- Run the updatemgr.hzn check command again to verify that a newer update does not exist./usr/local/horizon/update/updatemgr.hzn check
- Check the version of the upgraded appliance.vamicli version --appliance
- The new version is displayed.
- Check that IFCFG-ETH0 is present and properly configured.
- If not, copy or move the backup of the file to the original or recreate the original using VI editor with the contents of the backup. When done in VI, save the changes.mv /etc/sysconfig/networking/devices/ifcfg-eth0.bak /etc/sysconfig/networking/devices/ifcfg-eth0
- Restart the virtual appliance.
- Type reboot
- Validate the upgrade works properly after the reboot.
- If using a cluster then see the Upgrading a Cluster procedure in the documentation for whichever version you are upgrading to.
- Shut down each appliance within the cluster and boot each one up one at a time - waiting until the app server is fully started before booting the next. After this is done, you should see all nodes in the cluster properly sync and go green within approximately 30 minutes.
- Apply any post-upgrade patches if you have any to apply in accordance with their instructions.
- Delete the VM snapshot after a couple of days or if you are certain the upgrade process was successful.
Upgrade Issues and Troubleshooting Options:
Troubleshooting Upgrade Errors
UpdateInstaller Fails to Run on VMware Identity Manager On-Premises Full Appliance
Symptoms: Update, Update Check, Update Installer fail to run and/or show any outcome.
Cause:
Not enough available inodes (number of allowed files).
Correction:
- Run df. This will give you an idea of how much space you have.
- Run df -i. This will tell you how much inode space you have left.
- Example: If /var says 100% and you see inodes has less than 200 then you may have this issue.NOTE: An upgrade from VMware Identity Manager 2.6 to 2.7 typically requires around 209 inodes.
- The solution is to clear off enough files to free up enough inode space.NOTE: This can be done in any folder where there are enough files to make a difference.
- The recommendation is to use the /var/log folder as this is commonly the offender for inode consumption.
- To clear off bz2 log files more than 90 days old, do the following:
- Login to the appliance console directly (via vCenter) or via SSH (and SU to root).
- Browse to the /var/log foldercd /var/log
- Find and delete bz2 files older than 90 days. The below command deletes anything ending with the extension "bz2" which is older than 90 days from current date. You may need to delete more recent files to clear up enough inodes by changing the time frame to a lower range such as 45 days instead of 90 days.find ./*.bz2 -mtime +90 -exec rm {} \;
- Retest update installer, update check, and update./usr/local/horizon/update/updatemgr.hzn updateinstaller/usr/local/horizon/update/updatemgr.hzn check/usr/local/horizon/update/updatemgr.hzn update
Reference:
Information courtesy of Wibowo Leksono
UpdateInstaller Reports No Updates on VMware Identity Manager On-Premises Connector Appliance Version 2016.11.1.0
Symptoms:
Update Installer runs on VMware Identity Manager On-Premises Connector Version 2016.11.1.0 but reports no updates are available.
Cause:
Known Issue with VMware Identity Manager Connector version 2016.11.1.0.
Correction:
Reference:
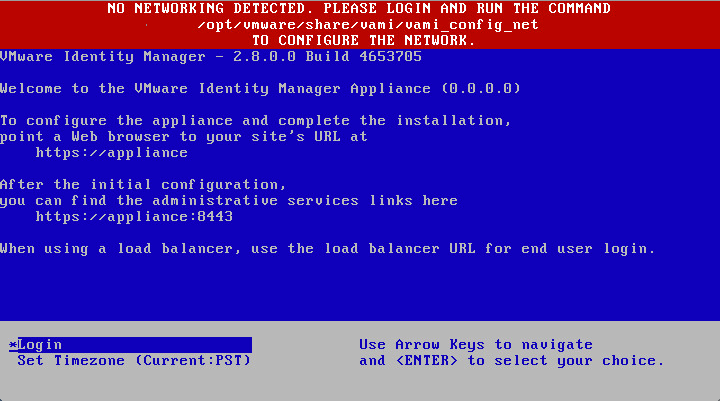
No Networking Detected on Reboot After Upgrade
Symptoms:
The upgraded SUSE appliance shows NO NETWORKING DETECTED errors. Logging in and looking at /etc/sysconfig/network (ls /etc/sysconfig/network -l -a) shows source file for ifcfg-eth0 is missing in /etc/sysconfig/networking/devices/ for /etc/sysconfig/network/ifcfg-eth0 link file.
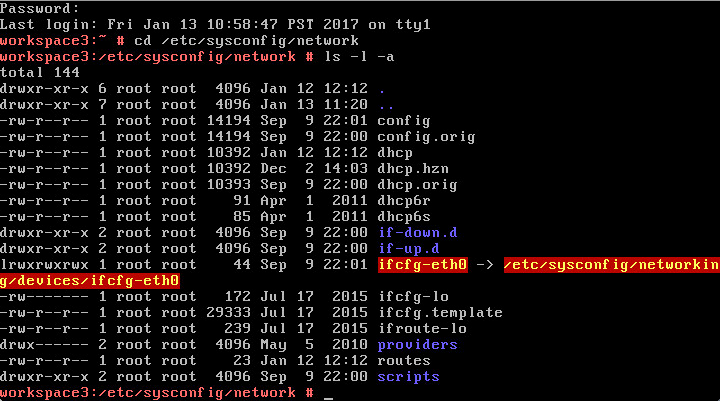
Cause:
Known Issue with upgrade process wiping ifcfg-eth0 information
Correction:
- Move the backup of ifcfg-eth0 taken during step 2.2 of The Upgrade Process back into place.
- Login to the appliance console or remote in as SSHUSER and then SU to root.
- Run the following command to move the backup of IFCFG-ETH0 into placemv /etc/sysconfig/networking/devices/ifcfg-eth0.bak /etc/sysconfig/networking/devices/ifcfg-eth0
- Exit the console or SSH session.exit
- Alternately (instead of step 1.), manually create the file.
- Login to the appliance console or remote in as SSHUSER and then SU to root.
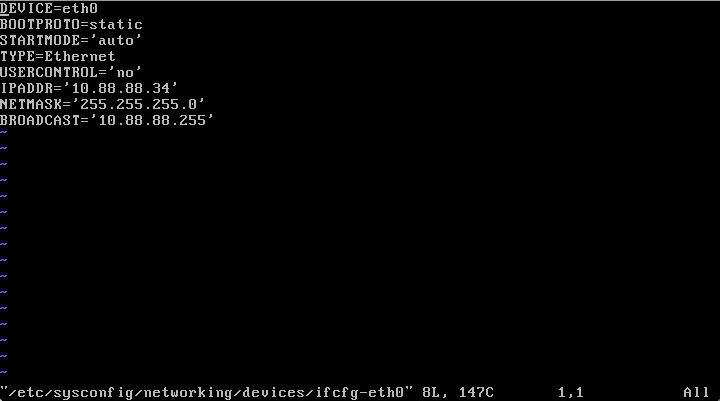
- Open the VI editor and create the file by typing the following command.vi /etc/sysconfic/network/ifcfg-eth0
- Type in all of the settings as shown in the below reference image. All lines except IPADDR=, NETMASK=, and BROADCAST= will be identical to what is in the image. To find your IP address, either ping or attempt to resolve the FQDN of the appliance to get the IP address, or look within the vApp advanced options of the VM to get the exact IP address. From there you should be able to fill in the below values.IPADDR=‘
’ NETMASK=‘’ BROADCAST=‘’ - Exit the INSERT mode by pressing the ESC key.
- Save the file and exit the VI editor by typing `:` (colon) then `x` (lower case "x") and then pressing the ENTER key.
- Reboot the appliance by typing reboot and pressing ENTER.
Reference Image:
20.10 Appliance Has No Network Detected After Upgrade - Missing vApp Options Within vCenter
Symptoms:
Appliance fails to communicate on the network.
Cause:
vApp Options Static Property Default Vaule for vm.vmname must be properly set to "IdentityManager".
Correction:
Ensure all vApp options are correctly set for 20.10.
- Power off the VM.
- Within vCenter, modify the vApp Options settings and ensure all settings are correctly set (use the reference link in this below within this section).
- Save all settings.
- Restart the VM.

References:
- Above information courtesy of David Holliman
- Rebuilding Workspace ONE Access vApp Option Settings - by Dean Flaming
20.10 Appliance RabbitMQ Fails to Start
Symptoms:
Appliance fails to boot properly and RabbitMQ fails to start after upgrading to 20.10 or 20.10.01.
Cause:
RabbitMQs Symbolic Link for the Erlang Cookie is missing. Specifically, the "/root.erlang.cookie" is not soft linked to "/var/lib/rabbitmq/.erlang.cookie".
Validate:
- Login to the VM console as root.
- Execute the following:
ls -l /root/.erlang.cookie
- Verify it is pointing to "/var/lib/rabbitmq/.erlang.cookie".
- If it is not present, follow the corrective steps below to recreate the symbolic link.
Correction:
Recreate the Symbolic Link for the Erlang Cookie and then restart.
- Login to the VM console as root.
- Execute the following commands to recreate the symbolic link to the Erlang Cookie.
systemctl status rabbitmq-server.servicerabbitmqctl list_queuessystemctl stop rabbitmq-server.servicecd /rootls -lat .er*rm -f .erlang.cookieln -s /var/lib/rabbitmq/.erlang.cookie ./systemctl start rabbitmq-server.servicerabbitmqctl list_queues
- Reboot the VM.
Reference:
- Above information courtesy of Karthikeyan Nagarajan and David Holliman