
Workspace ONE Access and Office 365 Integration with Azure AD and Tear Down Notes
INTRODUCTION:
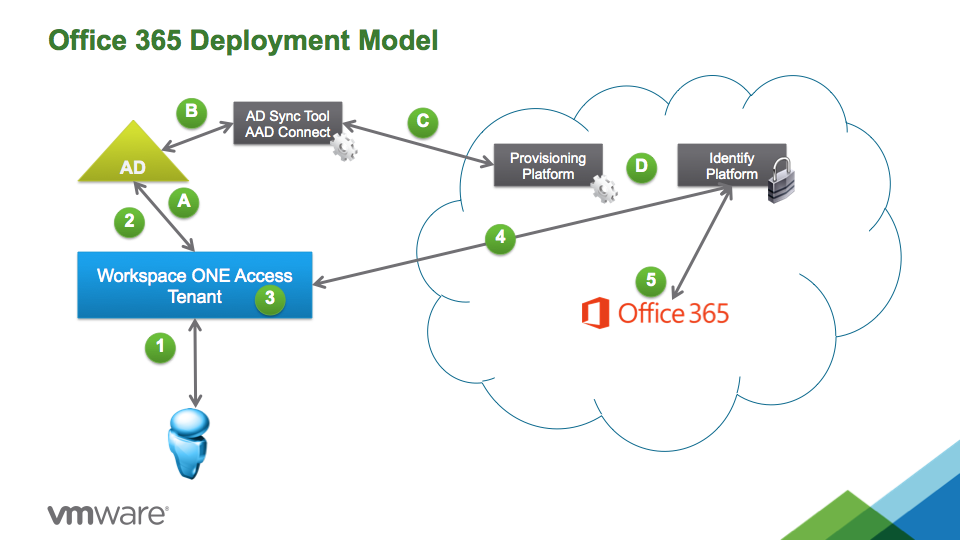
This is a simple whitepaper and procedures on integration of Workspace ONE Access with MS Office 365 (and Azure AD) as well "tear down" steps for a lab environment. It is designed to help someone go through all of the major steps with integration of a VMware Workspace ONE Access tenant with a Microsoft Azure & Office 365 tenant in order to fully test out the integration process as well as being able to tear everything back down and reset both tenants in order to repeat the process.
This is just one of the ways in which integration CAN work but not the only way. Each customer environment is very unique and will be different in some or many aspects. These procedures mainly focus on use of Workspace ONE Access to provide Single Sign-On into O365 resources and NOT provide provisioning (a.k.a. user account creation) in O365 nor automatically define license levels.
PREREQUISITES:
- Workspace ONE Access tenant (either on-premises or cloud will work)
- Administrative Login Info
- Globally Unique Issuer Name (e.g.
.vmwareidentity.com or.workspaceoneaccess.com or ".company.com "). - UPN and ImmutableID User Attributes (MS ImmutableID = Source Anchor and is either objectGUID or mS-DS-ConsistencyGuid)
- NOTE: Within newer Workspace ONE Access tenants, there is a "sourceAnchor" user attribute which can be used to define whether "objectGUID" or "mS-DS-ConsistencyGuid" is the mapped value for easy changing of Microsoft's ImmutableID (a.k.a. Source Anchor). In the case this doesn't exist, create this within the Admin UI under Identity & Access Management > Setup > User Attributes prior to creating the Directory and then ensure when setting up the tenant Directory (to an on-premises Active Directory via AD-IWA), ensure the desired User Attribute mappings are defined properly.
- A.D. Synchronized – Leave UPN as $(user.userPrincipalName)
- Workspace ONE Access Connector installed and activated on Domain Member
- Domain Integration with defined Source Anchor AND userPrincipalName
- $(user.sourceAnchor) = objectGUID or mS-DS-ConsistencyGuid
- NOTE: SEE SETTING UP SOURCE ANCHOR IN WORKSPACE ONE ACCESS SECTION
- O365/Azure tenant
- Customer must have O365 Premium Business account
- Customer O365 Admin credentials
- Issuer Uri (e.g. vidm.company.com or whatever is set in O365 VMware Identity Manager/Workspace ONE Access Apps)
- Customer’s desired Federation Brand Name (e.g. "VMware, Inc.")
- Passive Logon Uri (i.e. "https://
/SAAS/API/1.0/POST/sso ") - Active Logon Uri (i.e. "https://
/SAAS/auth/wsfed/active/logon ") - Metadata Exchange Uri (i.e. "https://
/SAAS/auth/wsfed/services/mex ") - SAML Signing Certificate (without spaces, carriage returns, "-----BEGIN CERTIFICATE-----",or "-----END CERTIFICATE-----")
- Licensing
- MS Office 365 Business Premium licenses (even just one will do for testing)
- VMware Workspace ONE Access (SaaS or On-Premises) will work without a license
WORKSPACE ONE UEM NOTES:
- For Workspace ONE UEM, so long as Workspace ONE Access is defined for Enrollment Authentication at the Company OG, Workspace ONE UEM does NOT need to know anything about mS-DS-ConsistencyGuid or sourceAnchor. Knowledge of these attributes can be handled solely within Workspace ONE Access. Enrollment Authentication is set within Workspace ONE UEM Admin Settings > Devices & Users > General > Enrollment under the Authentication tab on the Customer OG.

- For Hub Services within Workspace ONE to work properly, both Workspace ONE Access and Workspace ONE UEM do need to know about objectGUID and its specific mappings. This means, if using sourceAnchor in Workspace ONE Access, one must ALSO set "objectGUID" to a mapping of "objectGUID" in the Workspace ONE Access global User Attributes and in Directory settings under Mapped Attributes for synching into Workspace ONE Access (See screenshots within the SETTING UP SOURCE ANCHOR IN WORKSPACE ONE ACCESS procedure further below) as well as also having "Object Identifier" within the Workspace ONE UEM Settings > System > Enterprise Integrations > Directory Services section of the Customer OG where "Object Identifier" is mapped to "objectGUID".
 NOTE: It should again be noted, having objectGUID mapped into both Workspace ONE Access and Workspace ONE UEM are NOT required for O365 integrations unless specifically using the older objectGUID mappings for O365. Having objectGUID mappings in both Access and UEM ARE REQUIRED for Workspace ONE Hub Services to properly function. This is different than what is needed for O365 functionality.
STAND-UP (INTEGRATION) STEPS FOR A LAB:
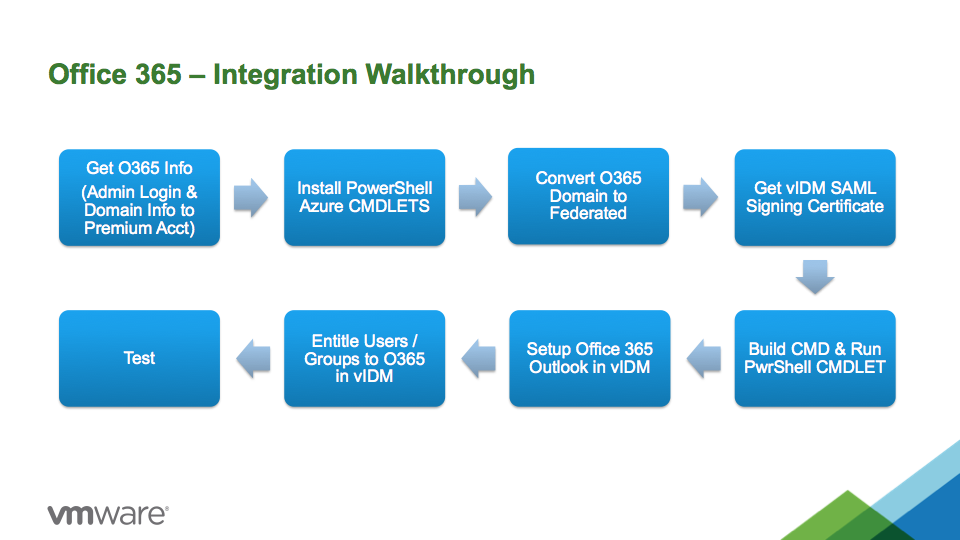
1. Use O365 or Azure Domain Admin Console to enable Active Directory sync
Office 365 Admin Console: https://portal.office.com or https://login.microsoft.com
Azure Admin Console: https://manage.windowsazure.com
2. Use O365 or Azure Domain Admin Console to create Azure Domain within Azure Tenant
3. Activate Sync in O365 or Azure Domain Admin console
4. Install Azure AD Connect tools on a Domain Member server
5. Walk through initial configurations of AAD Connect and conduct sync of On-premises Active Directory to Azure AD
NOTE: This is a wizard procedure within AAD Connect tools
6. Open PowerShell command prompt on member server where Azure AD Connect tools are installed and connect to Azure or O365 tenant
Command:
Connect-MsolService
7. In PowerShell, list the Azure Domains
Command:
Get-MsolDomain
8. Now it is time to Convert the Azure Domain if it is not already converted
NOTE: When Using Azure Admin Console and wizard options, domain is already converted to Federated (Skip step 8. and go to step 9.)
8.a. To convert an Azure Domain created through the O365 Admin Console, use the following command within PowerShell on the AD Domain Member Server where AAD Connect tools are installed.
Command Template:
Set-MsolDomainAuthentication -DomainName <domain> -Authentication Federated -IssuerUri <"Outlook Tenant Issuer"> -FederationBrandName <"My Company, Inc."> -PassiveLogOnUri "https://<Identity Manager Tenant FQDN>/SAAS/API/1.0/POST/sso" -ActiveLogOnUri "https://<Identity Manager Tenant FQDN>/SAAS/auth/wsfed/active/logon" -LogOffUri "https://login.microsoftonline.com/logout.srf" -MetadataExchangeUri "https://<Identity Manager Tenant FQDN>/SAAS/auth/wsfed/services/mex" -SigningCertificate <Get this from VMware Identity Manager / Workspace ONE Access admin UI>
Command Example:
Set-MsolDomainAuthentication -DomainName test.com -Authentication Federated -IssuerUri "test.vmwareidentity.com" -FederationBrandName "Test.com" -PassiveLogOnUri "https://test.vmwareidentity.com/SAAS/API/1.0/POST/sso" -ActiveLogOnUri "https://test.vmwareidentity.com/SAAS/auth/wsfed/active/logon" -LogOffUri "https://login.microsoftonline.com/logout.srf" -MetadataExchangeUri "https://test.vmwareidentity.com/SAAS/auth/wsfed/services/mex" -SigningCertificate MIIDHTCCAgWgAwIBAgIHRzGnzeX6CTANBgkqhkiG9w0BAQUFADBGMSAwHgYDVQQDDBdWTXdhcmUgSWRlbnRpdHkgTWFuYWdlcjEVMBMGA1UECgwMRkxBTUlOR1RFU1QxMQswCQYDVQQGEwJVUzAeFw0xNTA2MDIyMDE1MjhaFw0yNTA1MzAyMDE1MjhaMEYxIDAeBgNVBAMMF1ZNd2FyZSBJZGVudGl0eSBNYW5hZ2VyMRUwEwYDVQQKDKxGTEFNSU5HVEVTVDExCzAJBgNVBAYTAlVTMIIBIjANBgkqhkiG9w0BAQEFAAOCAQ8AMIIBCgKCAQEAvPTLdMe5VlWVmZq783oAAJcMipdJ5I1qw9k08sdy9kBTDj0zxGX9e3Pjokrk4ySB0F9gjDl5eb/DpOoyvMtmH8vEQe/w35pfxURJVnvT/qW0QqLiPllk1AyR0+j/1O0jO0IAZ4zVmsUCjtWt0FUTEHrBMEVE273bve7KExfLuuwxXDtaPwJ5cNFeB6f1SeZp+esEbP42MM7dQRsVwF+sUIgE5iU6jj0bMxM1Cp+cpusDwQoM9R+CfrcqWOZcN0SD+XhMtleCWKbRLYuqHgk1eVEHcR2oZCEj2dAHxT67T1U94nbue901brLN75Uw3rCH89K2flHDmoRj3ZwFymifZQIDAQABoxAwDjAMBgNVHRMEBTADAQH/MA0GCSqGSIb3DQEBBQUAA4IBAQCNLzLgkISAroUFZc0pXb0E7YPPMLcVDXAqdiF+v1j9nnvay4EhZgGFGzZgkAl0hEstMhQTVz5WL+0PiiXma+jxpAdnulwWIHz8rWs20fyT76LQpw1BWFyX3/EdIFPLB3Lt2Ji9tkfwjLoOZm7xQoBQWds2ABriS9r7nbDcY6fcDknxZyziwusSpwcbvaeL534WNJKo4flTMTiPhSR2xfz8WfgZlTICnWoeYLzT18uXZ9qbkCWiiOrchZK6VBL7b66E0Dm/YAyjie3DLbR8r965qmaxgNDFMakASHd/rIo5FL0jna94tGvICAQo8zrxKNcdVc04MykSgssGERPw5VzU
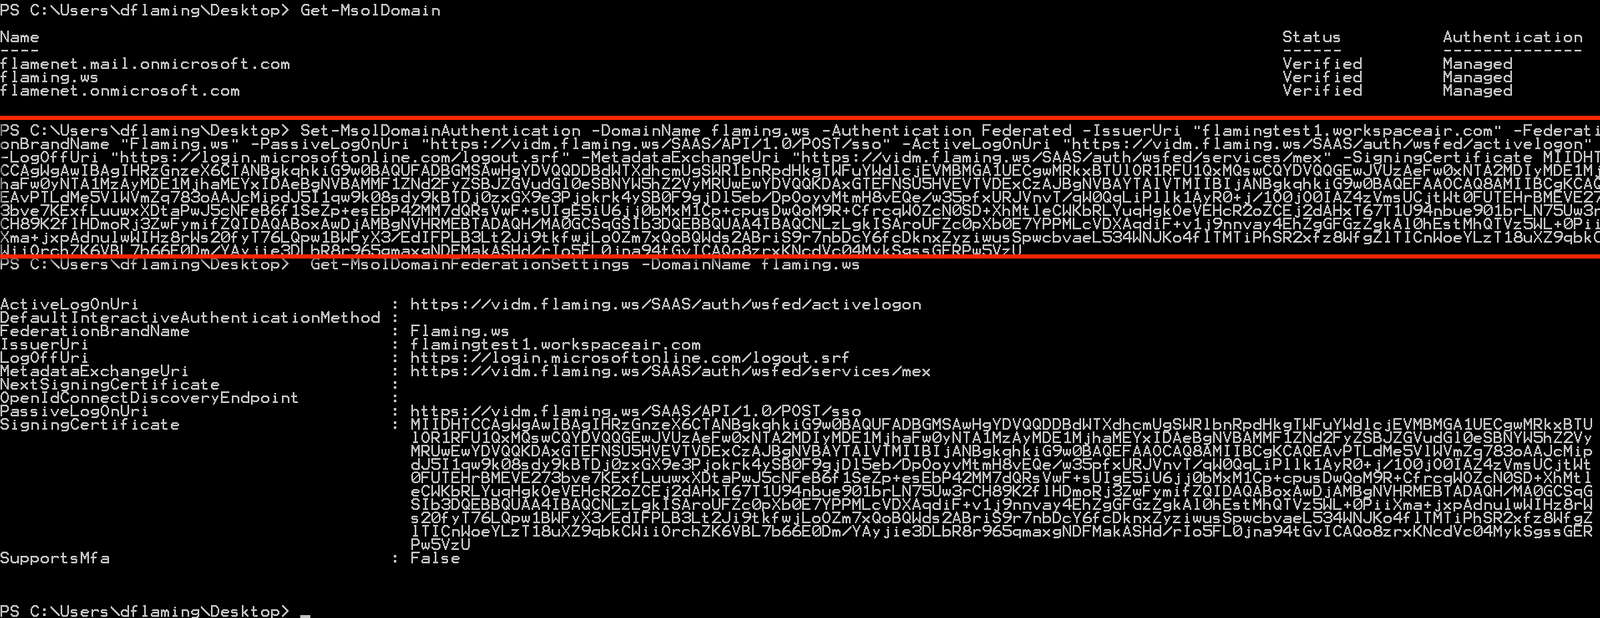
9. To verify a domain created and converted to "federated" through the Azure Admin console, use the following verification commands in PowerShell on the AD Domain Member Server where AAD Connect is installed and configured.
NOTE: THE FOLLOWING POWERSHELL COMMANDS ARE USED TO VERIFY THE DOMAIN CREATED THROUGH THE AZURE ADMIN CONSOLE ONLY. If you completed step 8. and 8a. then skip step 9.
9.a. Get the DNS (or TXT) domain record verifications for the actual owned domain (the one matching the Azure/O365 domain name created in the MS Azure tenant).
Command:
Get-MsolDomainVerificationDns -Domainname [domain] [-mode ,domainverificationmode.] [-tenantid ,guid.] [,commonparameters.]
Command Example:
Get-MsolDomainVerificationDns -Domainname test.com -Mode dnstxtrecord
9.b. Using the PowerShell Command Prompt on the AD Member Server where the AAD Connect tools are installed, run the following command to confirm the federation of the Azure Domain to the VMware Identity Manager / Workspace ONE Access Identity Provider (IdP).
NOTE: In order to confirm ownership of the actual domain, a custom TXT or MX DNS record must be added to the root domain entry. This would have been accomplished within the Azure Admin Console.
Command:
Confirm-MsolDomain -DomainName <string> [-ActiveLogOnUri <string>] [-DefaultInteractiveAuthenticationMethod <string>] [-FederationBrandName <string>] [-IssuerUri <string>] [-LogOffUri <string>] [-MetadataExchangeUri <string>] [-NextSigningCertificate <string>] [-OpenIDConnectDisoveryEndpoint <string>] [-PassiveLogOnUri <string>] [-SigningCertificate <string>] [-SupportsMFA <boolean>] [-TenantId <Guid>] [<CommonParameters>]
Command Example:
Confirm-MsolDomain -DomainName test.com -ActiveLogOnUri "https://test.vmwareidentity.com/SAAS/auth/wsfed/active/logon" -DefaultInteractiveAuthenticationMethod Federated -FederationBrandName "Test.com" -IssuerUri test.vmwareidentity.com -LogOffUri "https://login.microsoftonline.com/logout.srf" -MetadataExchangeUri "https://test.vmwareidentity.com/SAAS/auth/wsfed/services/mex" -PassiveLogOnUri "https://test.vmwareidentity.com/SAAS/API/1.0/POST/sso" -SigningCertificate MIIDHTCCAgWgAwIBAgIHRzGnzeX6CTANBgkqhkiG9w0BAQUFADBGMSAwHgYDVQQDDBdWTXdhcmUgSWRlbnRpdHkgTWFuYWdlcjEVMBMGA1UECgwMRkxBTUlOR1RFU1QxMQswCQYDVQQGEwJVUzAeFw0xNTA2MDIyMDE1MjhaFw0yNTA1MzAyMDE1MjhaMEYxIDAeBgNVBAMMF1ZNd2FyZSBJZGVudGl0eSBNYW5hZ2VyMRUwEwYDVQQKDKxGTEFNSU5HVEVTVDExCzAJBgNVBAYTAlVTMIIBIjANBgkqhkiG9w0BAQEFAAOCAQ8AMIIBCgKCAQEAvPTLdMe5VlWVmZq783oAAJcMipdJ5I1qw9k08sdy9kBTDj0zxGX9e3Pjokrk4ySB0F9gjDl5eb/DpOoyvMtmH8vEQe/w35pfxURJVnvT/qW0QqLiPllk1AyR0+j/1O0jO0IAZ4zVmsUCjtWt0FUTEHrBMEVE273bve7KExfLuuwxXDtaPwJ5cNFeB6f1SeZp+esEbP42MM7dQRsVwF+sUIgE5iU6jj0bMxM1Cp+cpusDwQoM9R+CfrcqWOZcN0SD+XhMtleCWKbRLYuqHgk1eVEHcR2oZCEj2dAHxT67T1U94nbue901brLN75Uw3rCH89K2flHDmoRj3ZwFymifZQIDAQABoxAwDjAMBgNVHRMEBTADAQH/MA0GCSqGSIb3DQEBBQUAA4IBAQCNLzLgkISAroUFZc0pXb0E7YPPMLcVDXAqdiF+v1j9nnvay4EhZgGFGzZgkAl0hEstMhQTVz5WL+0PiiXma+jxpAdnulwWIHz8rWs20fyT76LQpw1BWFyX3/EdIFPLB3Lt2Ji9tkfwjLoOZm7xQoBQWds2ABriS9r7nbDcY6fcDknxZyziwusSpwcbvaeL534WNJKo4flTMTiPhSR2xfz8WfgZlTICnWoeYLzT18uXZ9qbkCWiiOrchZK6VBL7b66E0Dm/YAyjie3DLbR8r965qmaxgNDFMakASHd/rIo5FL0jna94tGvICAQo8zrxKNcdVc04MykSgssGERPw5VzU
NOTE: The command looks very similar to that of the image shown in step 8.a.
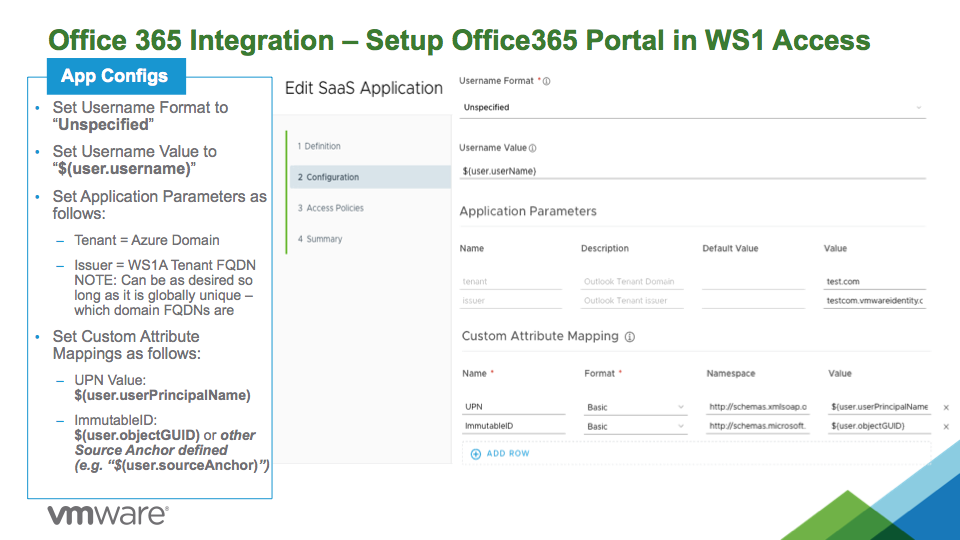
10. Within VMware Identity Manager / Workspace ONE Access admin UI, create the O365 resources using the "Office365 Portal" from the VMware Catalog (i.e. type "Office365 Portal" in the Search field when creating a new SaaS Application in the VMware Identity Manager/Workspace ONE Access Catalog).
11. DONE.
TEARDOWN STEPS FOR A LAB:
1. First we must connect to Azure AD within PowerShell. Using the PowerShell Command Prompt on the AD Member Server where the AAD Connect tools are installed, run the following commands to connect to the Azure tenant
Command:
Connect-MsolService
1.a. To list the Azure Domains within PowerShell use the following command:
Command:
Get-MsolDomain
2. Now we must convert the existing FEDERATED Azure Domain to a SYNC domain. Using the PowerShell Command Prompt on the AD Member Server where the AAD Connect tools are installed, run the following command to convert the federated domain back to a sync domain.
Command:
Convert-MSOLDomainToStandard –DomainName <federated domain name> -SkipUserConversion $false -PasswordFile <file>
Command Example:
Convert-MsolDomainToStandard -DomainName test.com -SkipUserConversion $false -PasswordFile "C:\userpasswords.txt"
NOTES: Operation cannot overwrite existing file. Additionally, the users must be converted during the domain conversion in order for the user accounts to be deleted (i.e. Use "-SkipUserConversion $false" to ensure users are converted).
3. Assuming we are completely tearing down the Azure Domain Integration with an IDP and the Azure Domain Federation, After converting the Azure Domain to SYNC, we can now deactivate the Azure Domain with Active Directory sync using one of the two following selections:
3.a. VIA MS CONSOLES
O365 ADMIN - Click USERS, SET UP next to ACTIVE DIRECTORY, and disable synchronization.
AZURE ADMIN - Select your tenant, Click on DIRECTORY INTEGRATION, click DEACTIVATE.
AZURE PREVIEW ADMIN - Select INTEGRATION, click DEPLOY DIRECTORY SYNC, then proceed to next step to deactivate.
3. b. POWERSHELL
Essentially we use the below command to set directory sync to false.
Command:
Set-MsolDirSyncEnabled -EnableDirSync $false
To check this occurred, use the following PowerShell command to validate
Command:
Get-MsolCompanyInformation
NOTE: Within the results, look to the value for DirectorySynchronizationEnabled - it should be false.
4. Again, assuming we are completely tearing down the Azure Domain Integration, we can now delete all users via one of the Azure or O365 Admin Consoles.
WARNING: DO NOT DELETE ADMIN ACCOUNTS!
NOTE: This may take multiple attempts to delete all users. Additionally, the AD Sync account may need to have the "User name" renamed from "Sync_" to something like "Disabled" before it can be deleted.
5. Again, assuming we are completely tearing down the Azure Domain Integration, we can now delete the Azure/O365 Domain via one of the Azure or O365 Admin Consoles or via PowerShell on the AD Domain Member where AAD Connect tools are installed. (see below for powershell)
Command:
Remove-MsolFederatedDomain -DomainName <string> [-SupportMulitpleDomain <Boolean>] [-Confirm] [-WhatIf] [<CommonParameters>]
6. Again, assuming we are completely tearing down the Azure Domain Integration, you may now uninstall the Azure AD Connect tools from the Activce Directory Domain member where they were installed. This is commonly listed as "Microsoft Azure AD Connect" in the Windows Add/Remove Programs wizard/applet.
NOTE: If the uninstall occurs correctly, this will remove all Azure tools and Azure PowerShell tools.
Once done, also remove any cached data within the registry of the AD member server where AAD Connect tools were installed (in the event you wish to redo the test from scratch).
6.a. Delete "%LOCALAPPDATA%\AADCONNECT".
6.b. Delete registry settings
"HKEY_LOCAL_MACHINE\SOFTWARE\Microsoft\ADHealthAgent"
"HKEY_LOCAL_MACHINE\SOFTWARE\Microsoft\Azure AD Connect"
7. At any point during this whole deactivation process, we can also delete any/all O365 apps from VMware Identity Manager / Workspace ONE Access which were initially created during this test process.
8. We must now wait for the Azure Domain deactivation to complete. This can take up to 24hrs but can be as quickly as an hour.
9. Again, assuming we are completely tearing down the Azure Domain Integration, we can also remove any TXT or MX records within the actual domain root DNS records. This is subject to Public DNS synchronization and DNS TTLs.
10. DONE
ADDITIONAL NOTES AND OPTIONS:
VMware Docs:
SAML Integrations Docs - https://www.vmware.com/support/pubs/vidm_webapp_sso.html
VMware Personal Blogs on Azure<>O365:
Workspace ONE and Azure AD: Part 1 - https://blog.virtualprivateer.com/workspace-one-and-azure-ad-1/
Workspace ONE and Azure AD: Part 2 - https://blog.virtualprivateer.com/workspace-one-and-azure-ad-2/
Workspace ONE and Azure AD: Part 3 - https://blog.virtualprivateer.com/workspace-one-and-azure-ad-3/
Azure AD Connect: Design Concepts (Using objectGUID or ms-DS-ConsistencyGuid and when to use one vs. the other and how to switch):
NOTE: When installing Azure AD Connect with Express mode, the Azure AD Connect wizard automatically determines the most appropriate AD attribute to use as the sourceAnchor attribute
How to Bulk Convert Users if Keeping Azure Domain:
Get-MsolUser -all | Where { -Not $_.UserPrincipalName.ToLower().StartsWith("admin@") } | ForEach { Set-MsolUserPrincipalName -ObjectId $_.ObjectId -NewUserPrincipalName ($_.UserPrincipalName.Split("@")[0] + "@example.com") }
MS Technet - DirSync: How To Switch From Single Sign-On To Password Sync:
Azure Active Directory:
SETTING UP SOURCE ANCHOR IN WORKSPACE ONE ACCESS:
When using sourceAnchor instead of objectGUID, prior to the directory in WS1 Access being configured, the User Attributes under Identity & Access Management > Setup > User Attributes need to have sourceAnchor defined and mapped to the correct Source Anchor / ImuutableID (i.e. objectGUID or mS-DS-ConsistencyGuid).
- Within the Workspace ONE Access Admin Console, browse to Identity & Access Management > Setup > User Attributes and ensure "sourceAnchor" is defined there.NOTE: It is possible "sourceAnchor" may not be there in some versions of Workspace ONE Access or VMware Identity Manager. If not, it can be manually added by clicking one of the green "+" signs.

- Now, when creating the Directory within Workspace ONE Access, ensure the mapped attribute for "sourceAnchor" is defined to either "objectGUID" or "mS-DS-ConsistencyGuid". Which is used will be based upon the on-premises Active Directory settings and Azure AD Connect synchronization settings defined.WARNING: It is recommended to do User Attribute changes within Workspace ONE Access PRIOR to creating a Workspace ONE Access Directory linked to Active Directory as making any attribute a REQUIRED attribute or removing ANY attribute will not be an option until the Workspace ONE Access Directory is deleted (and subsequently recreated after the User Attribute changes take place)!
- Browse to Identity & Access Management > Manage > Directory and if no directory exists, create a new directory (ADD DIRECTORY) and ensure on the User Attributes/Mapped Attributes section has the following attributes mapped.
- userPrincipalName -> userPrincipalNameNOTE: This is needed by O365/Azure domains along with the Source Anchor (below).
- sourceAnchor -> (either objectGUID or ms-DS-ConsistencyGuid)NOTE: Most of the Identity Industry defines this as Source Anchor while Microsoft defines this as ImmutableID. They are the same thing.

- Finish any additional mapping settings to create or update the directory and click SAVE/NEXT/SYNC on whichever wizard in order to finish confirmation of the settings to add in the above desired attributes.
- DONE
MICROSOFT DOCUMENTED SMART LINKS / DEEP LINKS:
Once an anchor O365 application is in place within Workspace ONE Access (for SSO), one can then create smart links or deep links to specific resources such as PowerPoint, Word, Excel, or other resources. This is done in order to simply provide an easy link for users which conducts Single Sign-on directly to the resource the user needs once authenticated to Workspace ONE Access rather than logging into Workspace ONE Access, then selecting O365, gaining access to the initial O365 panel of resources, and from there clicking on the specific app.
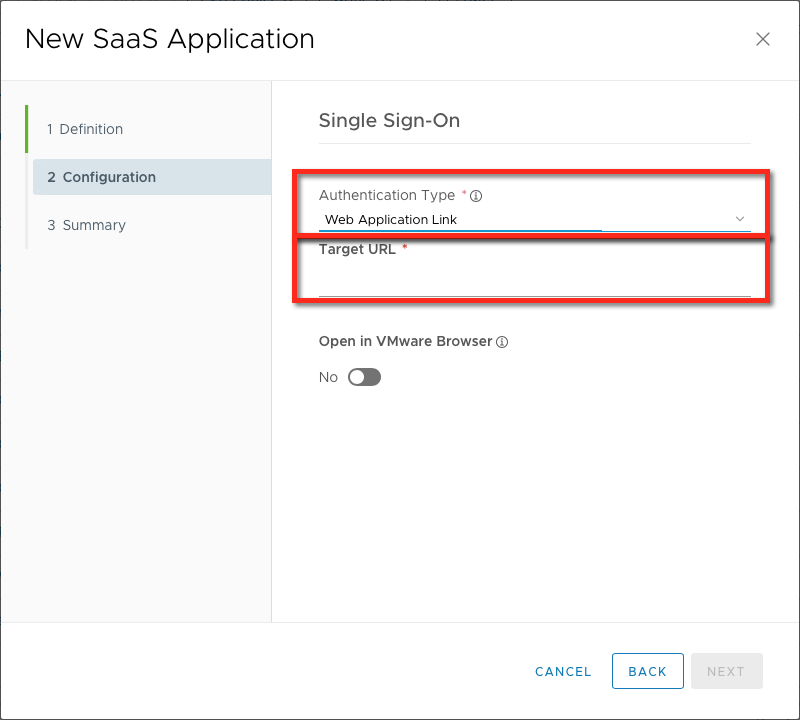
How this is done within Workspace ONE Access is simply by browsing to the Web Apps section of the Catalog, selecting the NEW button to create a new web app, typing in a name (no need to search - just type in name), uploading an icon (click NEXT), and then selecting "Web Application Link" for the Authentication Type and pasting in one of the below Microsoft Smart/Deep Link URLs for the specific resource. Once done, don't forget to set any categories and assign users/groups within the WS1 Access Administrator console.
Here are the Microsoft Documented Smart/Deep Links at last update of this document.
- Azure Admin Center: https://login.microsoftonline.com/login.srf?wa=wsignin1%2E0&rver=6%2E1%2E6206%2E0&wreply=https%3A%2F%2Fportal.azure.com%2Fsignin%2Findex&whr={your_domain_here.com}- Exchange Admin Center: https://outlook.office365.com/ecp/?rfr=Admin_o365&exsvurl=1&mkt=en-US&Realm={your_domain_here.com}- Excel: https://login.microsoftonline.com/login.srf?wa=wsignin1%2E0&rver=6%2E1%2E6206%2E0&wreply=https%3A%2F%2Foffice.live.com%2Fstart%2FExcel.aspx%3Fauth%3D2&whr={your_domain_here.com}- OneDrive: https://login.microsoftonline.com/login.srf?wa=wsignin1%2E0&rver=6%2E1%2E6206%2E0&wreply=https%3A%2F%2F{your_tenant_here}-my.sharepoint.com%2F&whr={your_domain_here.com}- Outlook Web Access: https://outlook.com/owa/{your_domain_here.com}- PowerPoint: https://login.microsoftonline.com/login.srf?wa=wsignin1%2E0&rver=6%2E1%2E6206%2E0&wreply=https%3A%2F%2Foffice.live.com%2Fstart%2FPowerPoint.aspx%3Fauth%3D2&whr={your_domain_here.com}- SharePoint: https://login.microsoftonline.com/login.srf?wa=wsignin1%2E0&rver=6%2E1%2E6206%2E0&wreply=https%3A%2F%2F{your_tenant_here}.sharepoint.com%2F&whr={your_domain_here.com}- Teams: https://login.microsoftonline.com/common/oauth2/authorize?client_id=cc15fd57-2c6c-4117-a88c-83b1d56b4bbe&response_mode=form_post&response_type=code+id_token&scope=openid+profile&redirect_uri=https%3a%2f%2fteams.microsoft.com%2f&domain_hint={your_domain_here.com}- Word: https://login.microsoftonline.com/login.srf?wa=wsignin1%2E0&rver=6%2E1%2E6206%2E0&wreply=https%3A%2F%2Foffice.live.com%2Fstart%2FWord.aspx%3Fauth%3D2&whr={your_domain_here.com}- Office 365 Admin Center: https://login.microsoftonline.com/common/oauth2/authorize?client_id=00000006-0000-0ff1-ce00-000000000000&response_mode=form_post&response_type=code+id_token&scope=openid+profile&redirect_uri=https%3a%2f%2fadmin.microsoft.com%2f&domain_hint={your_domain_here.com}- Power BI: https://app.powerbi.com/?noSignUpCheck=1&domain_hint={your_domain_here.com}- MyApps Service Provider Example: https://myapps.microsoft.com/{your_domain_here.com}/signin/{Service}%20{Name}%20{Here}/{Application_Guid_Goes_Here}
NOTE: Big Thanks to Matt Williams over at VirtualPrivateer for posting these all in one place.